
 I decided it was time to do something with my boring master bath! But I don't have a ton of money to put toward remodeling. I do however, have a bunch of paint sitting around my house and some grand ideas. I started out thinking that I was going to paint the cabinets a deep purple and then paint a design in the sinks, that incorporated the purple. I would then use that design above my shower as well. Then paint my counter top with a spray paint that would look like a dark granite. Tie it all together and add a happy color. Great Idea, right? So I did some research and found out that there are kits that can be used to paint cabinets and kits to paint counters and even kits to paint sinks and tubs and toilets. They were expensive (ish) and they didn't allow me to use the colors that I wanted. No one could recommend another type of paint that would stand up to the wear and tear that a bathroom endures. And it would be even more expensive to have it done professionally. This however was just my first hurdle. The spray paint that I wanted to use could only be bought by the case. I don't need a case of this!! And I don't want to try and sell or give away cans of spray paint. I tried to get the local hardware store to buy the case and sell me a can, but they would only sell me the case as well. Even through the Brand website, you could only buy a case. I didn't like any of the other colors, so that idea was shot. At this point I had given up on the whole idea.
I could not find black paint. I did however find a purple paint that was deep and rich and I liked the look of it immediately. The thought going through my head: "This might look cool with the glitter on top. What's the worst that could happen? If I hate it, I'll just start over." And a new idea was born. I would get the purple into the bathroom that I originally wanted and a not-so-boring counter top makeover. Here are the steps that I took:
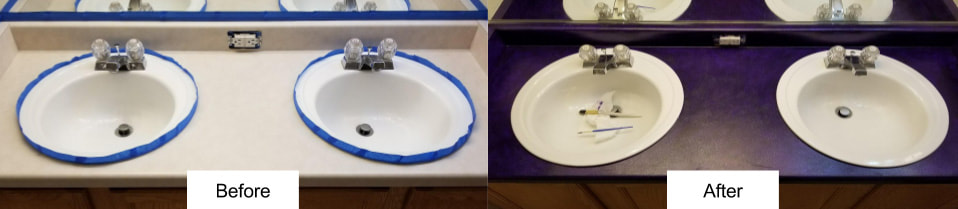
4. Tape. I taped the walls, mirrors and sink, to keep paint from ruining these surfaces. You may want to cover the cabinets in news paper or with plastic trash bags as well, so that you don't get paint on them. I will be redoing the cabinets later, so I didn't worry about covering them. Try get as straight a line as possible with your tape. This is your straight edge or the paint as well as a protector for you walls and sinks.
I think it turned out pretty well! In summation: Tape off walls, sink, etc. Sand Clean surface 4 coats of purple 1 coat black glitter paint 1 coat spray paint (clear enamel) 3 coats Dishwasher Safe Mod Podge
Cost Analysis:
VS the cost of a Counter Refinishing Kit at the local home improvement store = $79.95 https://www.homedepot.com/p/Giani-Granite-Bombay-Black-Countertop-Paint-Kit-FG-GI-Bombay/203644698 If I had used black base paint instead of purple, I would have had the same outcome as the kit in the link above. I chose to use what I had on hand. If you are starting from scratch, then you can customize your outcome. Savings = $54.00 Thanks for reading! Keep in mind that I am in no way qualified for the projects that I share. I'm learning as I go! Terry Update: 02/13/2018The Mod Podge needed 28 days, before it was completely cured. I reached that 28 day mark on February 9th. I waited until the end of the 28 days, to reinstall the outlet cover that I had removed, before painting. The cover has now been replaced, and the counter is holding up well.
I use it as had before it was painted. It has a hot hair straightener on it and has water sitting on it frequently. I'm not careful about setting things down or wiping up spots of water, etc. The paint and the finish are as they were the day I completed the project. I will add updates periodically, to let you know how the finish holds up to time and use.
0 Comments
Leave a Reply. |
AuthorIf I can find a cheaper way to do it, I will! 
Archives
March 2018
Categories |


